| Welcome, Guest |
You have to register before you can post on our site.
|
| Online Users |
There are currently 210 online users.
» 2 Member(s) | 205 Guest(s)
Bing, Facebook, Google
|
|
|
| Silksong Bell Beast Guide: Read the Dust, Pogo the Charge |
|
Posted by: xtameembb - 10-23-2026, 01:58 AM - Forum: My Forum
- No Replies
|
 |
I’ll be honest: when I first dropped into Hollow Knight: Silksong without a fresh Hollow Knight save in my rearview, the game gave me a proper kick in the teeth. No hand-holding, tough boss fights, and a difficulty curve that does not care about your feelings. After clearing the Moss Mother’s trial, another foe shows up shortly after, and that is where the Bell Beast comes in. In my latest run through Pharloom, I found that this boss is not optional — but it is also one of the easiest bosses in the game once you learn its tells. In 2026, with Silksong guides absolutely everywhere, the best advice is still simple: watch the dust, keep your cool, and do not get greedy.
How I Triggered the Bell Beast Fight
After getting the Silkspear ability in Silksong, I returned to the place where a creature is stuck in a web. Destroy that web, and the Bell Beast boss fight kicks off. The reward for beating it is your very first Silk Heart improvement, which makes the detour well worth it. If you are struggling to beat Bell Beast, the key is understanding its moves and attacks instead of panic-jumping around the arena like a headless tiktik.
Quick Reference Table
Tell
What It Means
My Response
Dust appears at either end of the arena
Phase 1 charge or jump incoming
Stay calm and read the dust height
Dust only reaches the middle of the screen
Bell Beast will charge in the opposite direction
Hold jump to avoid, then pogo attack
Dust reaches the ceiling
Bell Beast will jump and land on the opposite side
Move to the other side, leave landing space, punish briefly
Boss roars from the middle
Enraged phase begins; bells fall from the roof
Avoid the falling point and jump if needed
Ground dust appears anywhere
Bell Beast may emerge and throw bells
Keep your eyes peeled on the floor
Phase 1: Dust Is Your Best Friend
Pay attention to the dust on the ground, because that is where the Bell Beast will appear. In phase 1, the dust will only appear at the two ends of the arena. The first dust pattern only reaches the middle of the screen, which means the Bell Beast will charge in the opposite direction. I hold the jump button to avoid the hit, then use the pogo attack — the plunge hit — to deal damage while it moves. To do that, aim down and press attack. This is the bread and butter of the fight, and once it clicks, the Bell Beast starts looking like a piece of cake.
If the dust reaches the ceiling, that means the Bell Beast will jump and land on the opposite side. When that happens, I get ready on the other side and leave enough space for the landing, because the Bell Beast is vulnerable to being hit for a brief second. That window is short, so I take one or two hits and reset. Do not overcommit; greed is how you end up on the ropes.
Enraged Phase: Bells, Bells, and More Bells
After chipping the creature’s HP, it will get enraged and appear from the middle, roaring and causing bells to fall from the roof. I avoid the bell’s falling point and jump to avoid the bell if necessary. From now on, the Bell Beast will occasionally appear from the ground, throwing bells as it emerges. So now the boss has three attacks. This move can appear anywhere on the arena, so I make sure to keep an eye on the ground at all times. Later, some bells will also start falling from the ceiling, meaning I have to keep an eye on both sides of the screen. It sounds chaotic, but the rhythm is readable — stay mobile, watch the floor, and respect the falling bells.
My Final Take
The Bell Beast is a classic Silksong skill check: it punishes sloppy movement but rewards patience and clean pogo hits. Once I stopped treating it like a wall and started treating it like a pattern, the fight became one of the easiest in Pharloom. Read the dust, hold jump when the charge comes, pogo the charge, punish the landing, and keep your head on a swivel when the bells start dropping. That is the whole game plan — and it works.
If you’ve finally cleaned up the Bell Beast and want to keep your momentum going, the next step is making sure your library is stocked for whatever Pharloom throws at you next. Whether you’re chasing down Silksong or lining up another metroidvania to sink your teeth into, it helps to know where the discounts are before you commit.
That’s where DealNest comes in. It keeps an eye on game discounts across storefronts so you can spend less on the titles you actually want to play. Before you check out on your next purchase, take a look at DealNest for the best game deals and get more mileage out of your gaming budget.
|

|
|
| Lineth Beerensteyn: FC 27 TOTW Guide |
|
Posted by: xtameembb - 10-22-2026, 11:41 PM - Forum: My Forum
- No Replies
|
|
Introduction About Lineth Beerensteyn
Lineth Beerensteyn is a Dutch professional footballer who has built a reputation as a forward with a sharp eye for goal and a fearless approach to attacking play. Her energy, movement, and confidence in the final third make her a player defenders find difficult to contain.
As a striker, Beerensteyn stands out for her pace, direct running, and intelligent positioning. She can stretch defenses with her speed, press opponents into mistakes, and create scoring chances through both her finishing and her willingness to take on responsibility in important moments.
Her career has included spells at prominent clubs and regular involvement with the Netherlands national team, where she has contributed as a lively and determined attacking option. Through her work rate and attacking instincts, Beerensteyn has established herself as a striker capable of making a meaningful impact at the highest level.
Lineth Beerensteyn's Team of the Week card
Lineth Beerensteyn’s Team of the Week card arrives as an 84-rated striker, bringing a well-rounded attacking profile highlighted by 91 pace, 87 dribbling, 84 shooting, 78 physicality, 74 passing, and 51 defense. As a striker, her standout speed and close control make her a sharp attacking outlet who can quickly break through the opposition’s back line, create separation in dangerous areas, and capitalize on scoring chances to decide matches and seal the result.

How to Obtain Lineth Beerensteyn's Player Card
There are a few ways to obtain Lineth Beerensteyn's Team of the Week card in FC 27: first, you can purchase card packs and try your luck, although the chances of getting the Team of the Week card are relatively low and uncertain; second, you can complete SBC (Squad Building Challenges) tasks, which may reward you with the card, although success is not guaranteed and depends on completing the required challenges; and third, you can directly purchase the card from the transfer market, although this card has just been launched and there are no transaction records yet, and the price will likely be more expensive if we refer to past transactions of similar cards.

Fastest Ways to Earn FC 27 Coins

Selling club player cards, completing weekly objectives, and grinding game modes are traditional ways to earn fc 27 coins, but they can be slow and rely heavily on skill, rewards, and market luck. Saving enough fifa coins for a Team of the Week Lineth Beerensteyn card may therefore take far longer than expected.
For a faster option, players can buy fifa coins through LootBar.com, which offers competitive prices, a 10% discount for new users, regular promotions, and quick delivery through secure trading methods. This lets you obtain the coins needed for the player card you want without waiting through countless matches or objectives.
What is the best Gaming Top-Up Platform?
LootBar stands out as a reliable and professional platform for gaming recharge. Its reliability and popularity are reflected in excellent reviews, including a 4.9/5.0 rating on Trustpilot.
|
|
|
|
| Clearing Crawbugs Above Halfway Home: A Silksong Wish Story |
|
Posted by: xtameembb - 10-22-2026, 03:45 PM - Forum: My Forum
- No Replies
|
|
I still remember the way Bellhart changed after I broke the Widow's curse. One moment the town was a held breath; the next, shutters banged open, and the Wishwall beside the vendor began to feel like a lighthouse ledger—small rescues recorded in neat rows, each one a light for someone else. That is where I found Crawbug Clearing in Silksong. In 2026, the route is well understood, but the Wish still has a humble charm: speak with Creige at Halfway Home Inn in Greymoor, gather 25 Crawbug Ragpelts, and help him build a scarecrow so the Craws stop harassing pilgrims. It is not a grand crusade. It is the kind of errand that reminds me Pharloom's smallest problems can bruise its biggest hospitality.
Before any of that, I had to finish Threadspun Town and lift Bellhart's curse. Once the Widow's hold broke and the citizens returned to their cheerful routines, the Wishwall next to the vendor opened up for me. I scanned the board, found Crawbug Clearing, and accepted it. The objective was clear enough: visit the Halfway Home Inn inside Greymoor and talk to Creige. If you are following my footsteps, make sure you have completed the curse-lifting chain first; the Wish will not be available before Bellhart is restored. ?️
At Halfway Home, Creige greeted me with the tired urgency of an innkeeper who has been losing sleep. Craws had nested on the roof of his establishment, and they had grown bold enough to attack Pilgrims seeking refuge below. Business was suffering, and so was his patience. He asked me to bring him 25 Crawbug Ragpelts so he could construct a scarecrow atop the inn. The logic was simple: give the Craws a false rival, and they might stop treating the roof like a personal fortress. I liked the plan. It was cheap, practical, and just strange enough for Pharloom.
Quest detail
What I needed to know
Wish name
Crawbug Clearing
Quest giver
Creige at Halfway Home Inn
Region
Greymoor
Requirement
25 Crawbug Ragpelts
Reward
Crafting kit expansion
Main benefit
More damage from Hornet's tools
There are two ways to collect the Ragpelts. The broader hunting ground is Craw Lake, the rightmost part of Greymoor, where Crawbugs are plentiful enough to make a slow but steady sweep. The second method is much faster for me: farm the Crawbugs directly on top of the Halfway Home Inn. The first time I heard this, I laughed. The solution was literally above the problem. Creige wanted a scarecrow on the roof, and the roof was already the best source of materials. It was a little like asking a baker to fix a leaky roof by baking more bread. ?
Here is the loop I used, and it worked cleanly:
Exit Halfway Home through the east entrance on the left side.
Climb the platforms right outside the inn to reach the roof.
Two Crawbugs spawn on the roof. Defeat both to collect two Crawbug Ragpelts.
Drop back down and re-enter the Halfway Home Inn.
Leave again to respawn the Crawbugs on the roof.
Repeat until the counter reaches 25.
The rhythm of that route was almost mechanical—two kills, one exit, one re-entry—and after a few cycles I stopped thinking of it as farming. It became a clockmaker's thumb testing a gear: small, precise, repeated until the whole mechanism turned. The Ragpelts piled up like dry leaves in a gutter after a storm, and before long I had the full bundle. If the respawn loop ever feels tedious, remember that Craw Lake exists as a fallback; but for pure efficiency, the inn roof is hard to beat. Just be careful on the climb and keep the fights short. Hornet's mobility makes the route quick, and the two Crawbugs are not difficult once you know where they appear.
With 25 Crawbug Ragpelts in hand, I returned to Creige. The hand-in was instant, and the Wish was marked complete. My reward was a crafting kit expansion, which increased the damage Hornet deals with her tools. That might sound modest next to a new mask shard or a fresh crest, but in Silksong, tool damage adds up. A stronger kit can turn a scrappy fight into a controlled one, and I have never regretted spending a few minutes on a Wish that makes every later scrap a little cleaner. ?️
What I remember most is not the reward, though. It is the image of Creige standing below his own roof, fretting over guests while the cause of his trouble scuttled overhead. Crawbug Clearing is a small story about maintenance: of an inn, of a route, of a community trying to get back on its feet after a curse. I arrived expecting a chore and left with a better sense of why the Wishwall matters. In 2026, with so many guides and routes available, it is easy to reduce a quest to a checklist. But Pharloom is at its best when even a scarecrow errand feels like a tiny act of repair.
If this small act of repair leaves you eager for the next expedition—whether back into Pharloom or into another hand-crafted action-adventure—it helps to keep an eye on what’s worth playing next without overspending. DealNest gathers best game deals in one place, making it easier to spot discounts on titles that reward the same patience and curiosity.
|
|
|
|
| Silksong Guide: Claiming Bellhome in Bellhart and Furnishing Hornet’s New Home |
|
Posted by: xtameembb - 10-22-2026, 02:54 PM - Forum: My Forum
- No Replies
|
|
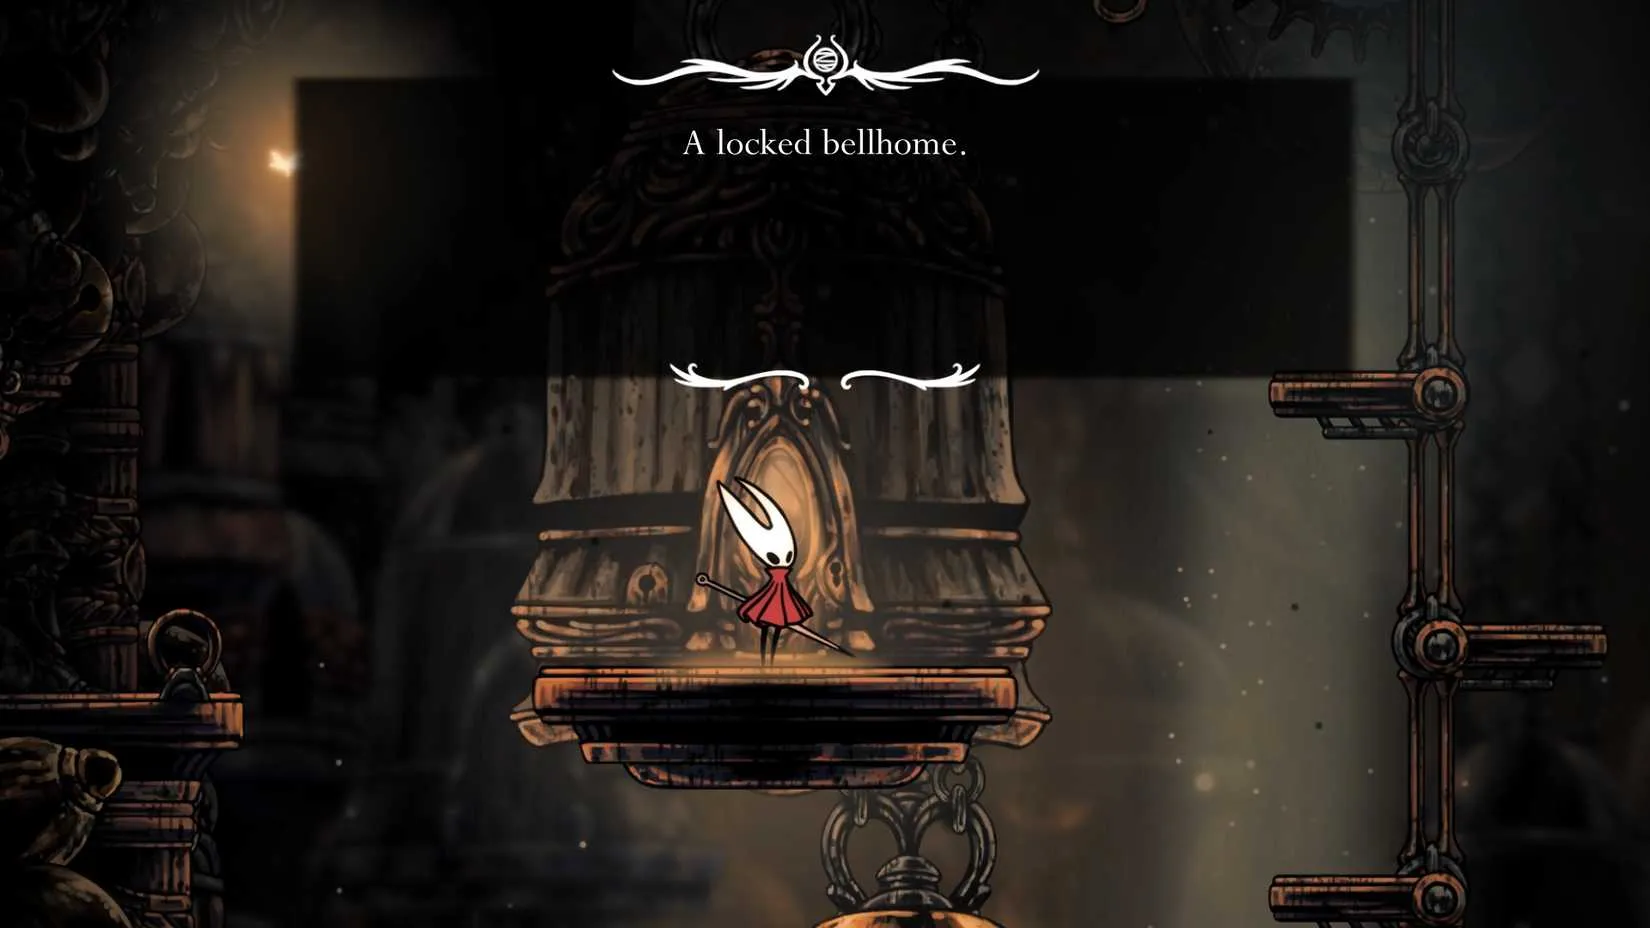
In the sprawling, dangerous kingdom of Pharloom, benches remain the traveler’s best friend: they save progress, restore health, and record maps. Yet Hollow Knight: Silksong offers Hornet something more permanent. In Bellhart, after the town’s curse is broken, a locked Bellhome waits above the Relic Seeker Scrounge residence. As of 2026, this residence has become a widely discussed late-game milestone because it gives players a personal base and a set of furniture with practical benefits.
Earning the Bellhome Key
Bellhart’s Wishwall becomes active after the curse is lifted. NPC wishes appear there, and players should prioritize the restoration-related donation quest while speaking with Pavo on every visit. Pavo is the NPC who ultimately grants the Bellhome Key. Completion of every Bellhart wish is not strictly required, but if Pavo does not offer the key, the reliable fallback is to finish the remaining wishes and leave and re-enter Bellhart several times to advance his dialogue.
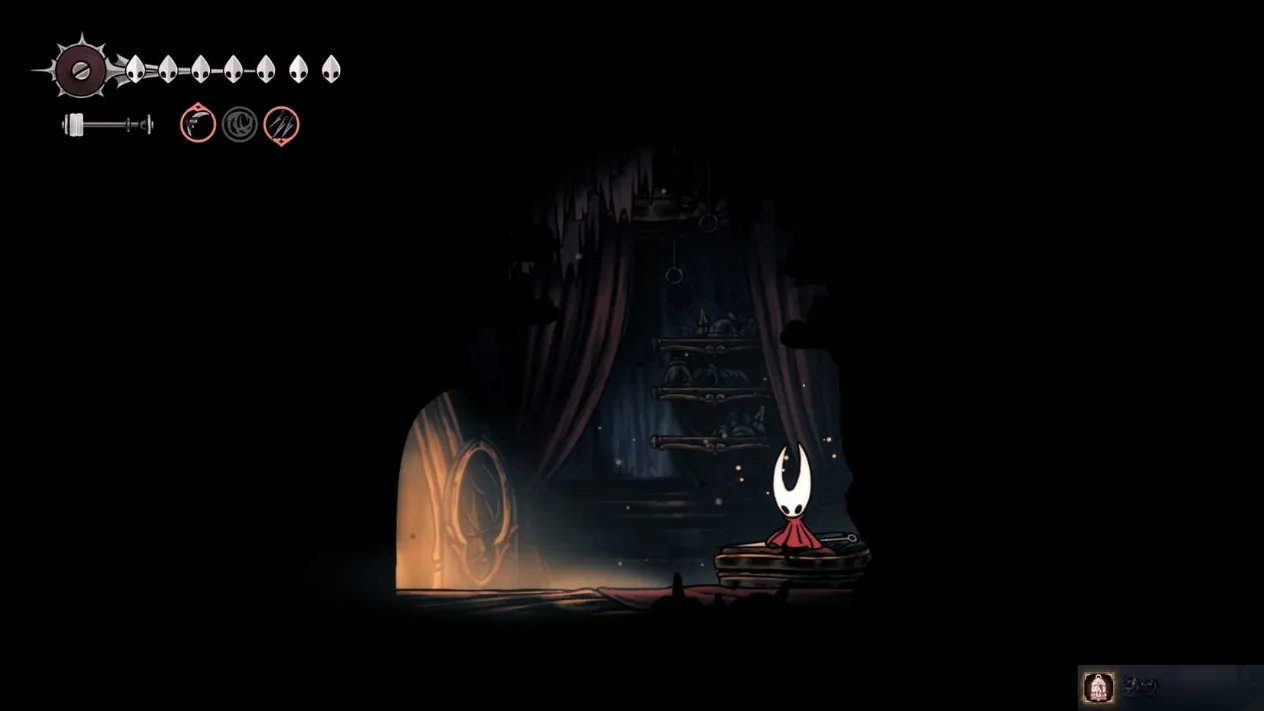
Once Pavo hands over the Bellhome Key, players climb to the upper side of Bellhart and find the locked Bellhome above the Relic Seeker Scrounge home. Using the key opens the door. The first entry awards the Resident achievement, a clear signal that Hornet has become a Bellhart resident rather than a passing traveler.
Furniture and Practical Upgrades
After the first entry, Frey’s shop begins offering furniture additions for the Bellhome. The residence is not merely cosmetic; several items add utility for collectors and combat-focused players alike.
Upgrade
Cost
Benefit
? Desk
—
Lets Hornet review past Relic and Cylinder collections, including items already handed to NPCs
? Materium
—
Displays other collected items and combines with the Desk
? Gleamlights
320 Rosaries
Adds a string of light to the Bellhome
? Bell Lacquer
—
Allows players to paint the Bellhome; the painting process requires resetting the area to complete
? Personal Spa
1100 Rosaries
Restores Hornet’s HP and Silk to full, like the Citadel Spa
The Materium is found in Memorium, north of the room where players obtain a Cogheart Piece. When used at the Bellhome, it shows all items Hornet has previously collected, even those she no longer carries in her inventory. That makes the Bellhome a quiet archive for lore hunters and completionists.
The Personal Spa is the most important furniture addition. Soaking in the hot tub restores Hornet’s HP and Silk to full, matching the Citadel Spa’s function. Its 1100 Rosary price is hefty, so players should budget before committing. Gleamlights cost 320 Rosaries and add a string of light, while Bell Lacquer gives the home a personal visual identity.
Why the Bellhome Matters in 2026
For players working through Silksong’s late-game content, the Bellhome consolidates several quality-of-life features. The Desk and Materium provide a record of Relic and Cylinder collections, reducing the need to track handed-in items manually. The Personal Spa offers a restorative stop in Bellhart, and the Resident achievement adds a completionist milestone.
The Bellhome also reflects Bellhart’s restoration. Claiming it requires engagement with the town’s Wishwall and Pavo’s dialogue, so the residence feels earned rather than purchased. Players who cannot trigger the key should not assume the house is bugged; finishing remaining wishes and repeatedly leaving and returning to Bellhart is the recommended troubleshooting step.
With its key, achievement, furniture, and spa, the Bellhome turns a locked door in Bellhart into one of Silksong’s most practical personal spaces. For Hornet, it is a rare shelter in Pharloom. For players in 2026, it is a checklist item worth pursuing.
Budgeting Rosaries for the Bellhome is one thing, but many players also end up shopping for real-world gaming accessories—controllers, headsets, or storage—after sinking hours into Pharloom. Before paying full price, it’s worth checking whether those extras are discounted elsewhere, especially if you’re already keeping an eye on costs.
DealNest makes that step less tedious by collecting current offers in one place, so you can compare prices here before committing to a purchase. Treat it like a quick pre-purchase check: a few minutes of comparison can stretch your budget further, whether you’re buying a single upgrade or planning a larger setup.
|
|
|
|
| Broodfeast Quest in Silksong: A 2026 Guide to Organ Harvesting (with Humor) |
|
Posted by: xtameembb - 10-22-2026, 12:11 PM - Forum: My Forum
- No Replies
|
|
Broodfeast: Because Every Huntress Deserves a Gore-Soaked Dinner Party
In the year 2026, Hollow Knight: Silksong still stands as a beacon of brutal platforming and bug-slaying, and one of its most delightfully disgusting side quests is the Broodfeast. Hornet, our stoic and stylish protagonist, finds herself in the Putrified Ducts, face-to-face with a charmingly creepy NPC called the Huntress. This lovely lady doesn't want flowers or a thank-you note—she wants organs. Specifically, 60 of them, harvested in three very particular ways. It's less a quest and more a butcher's shopping list, but hey, who are we to judge a bug's culinary preferences?
The Broodfeast is technically a "Hunt" quest, which in Silksong terms means "go kill things with specific tools and bring back the gooey bits." The Huntress, presumably too busy polishing her collection of skulls, delegates the messy work to Hornet. The good news? You don't have to wander aimlessly across Pharloom. The bad news? You'll need three specific tools and a whole lot of patience (or a good bench loop).
How to Trigger the Broodfeast Quest (Without Getting Lost)
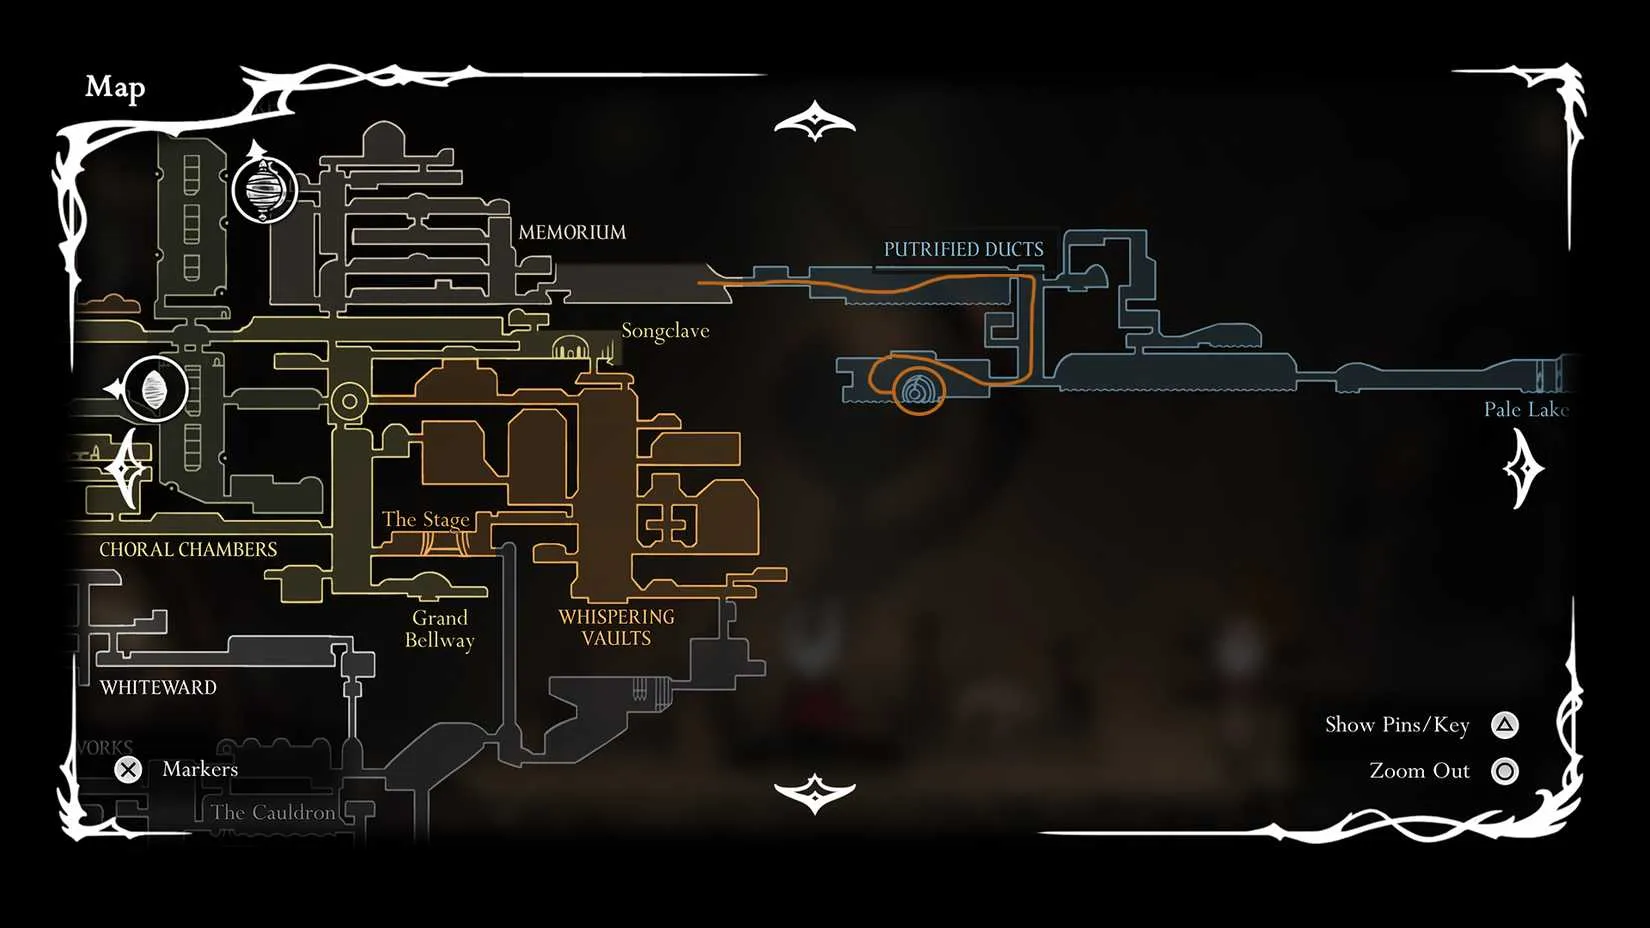
First things first: get yourself to the Putrified Ducts. This charming neighborhood is filled with vine traps, aggressive bugs, and a distinct lack of five-star restaurants. Explore the southern part of the region, and eventually you'll bump into the Huntress. She's hard to miss—she's the one with the unsettling smile and a passion for organ-based cuisine.
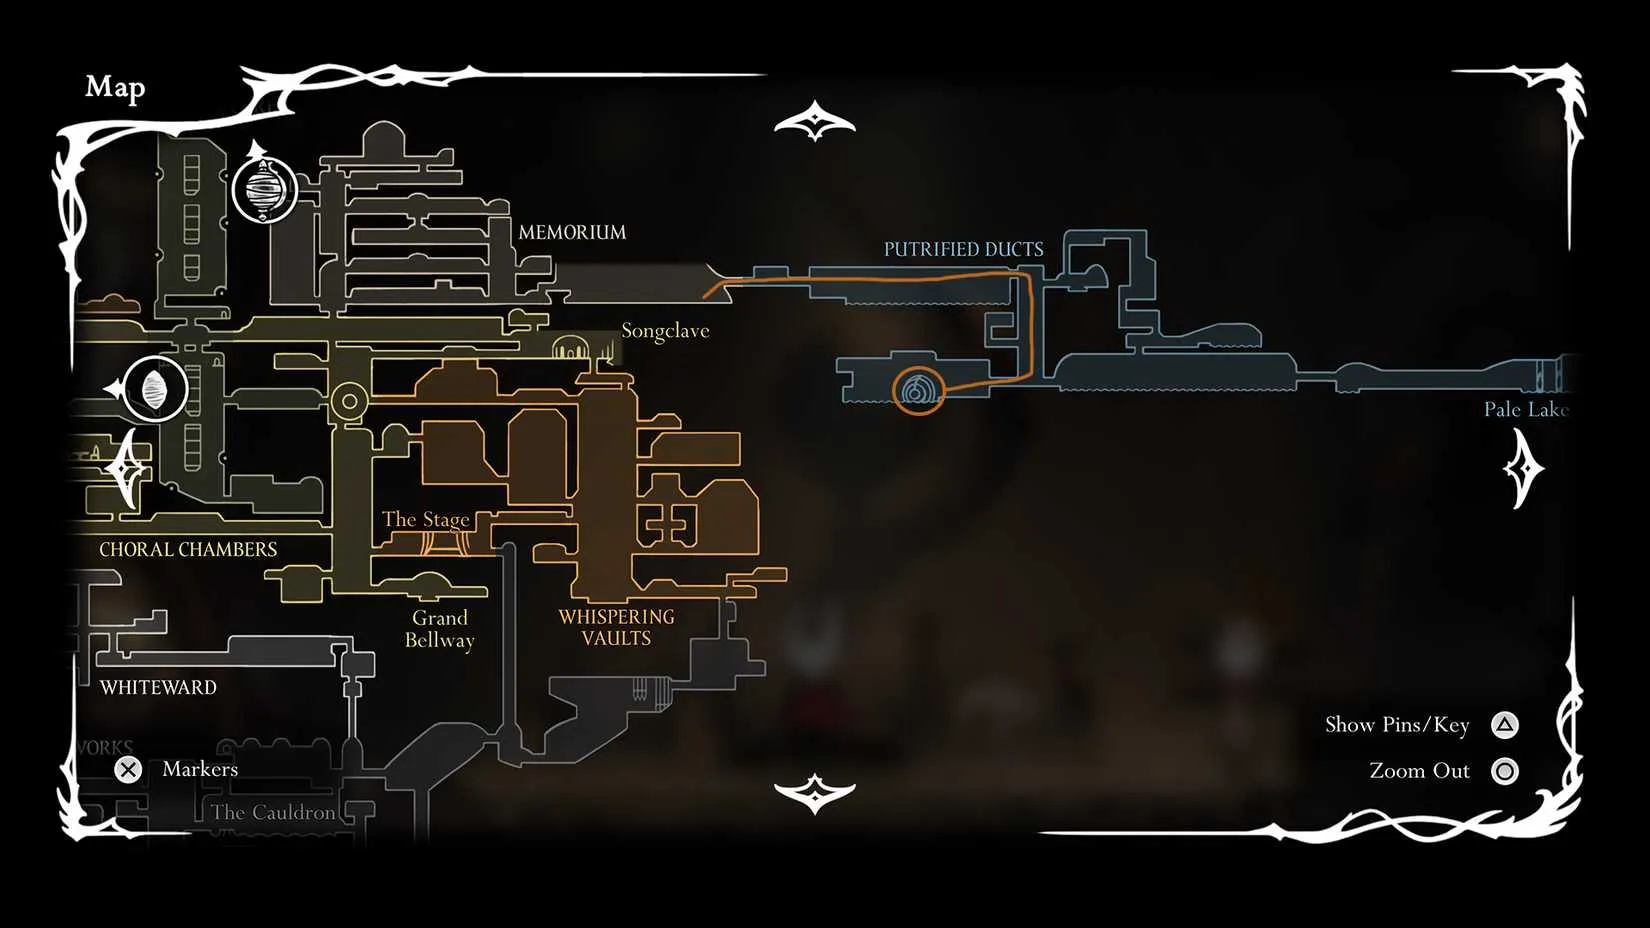
On your first visit, you'll need to trek all the way to the southwest of the Putrified Ducts to reach her. It's a bit of a hike, and the local wildlife will try to turn Hornet into a pincushion. But once you've found her and accepted the quest, you can unlock a shortcut that drops you right next to her from the Putrified Ducts Bench. After that, visiting the Huntress becomes a breeze—just drop down and say hello.
The Three Courses of the Broodfeast
The Huntress isn't asking for just any organs. Oh no, that would be too simple. She wants them seared, shredded, and skewered—each requiring a different tool to deliver the final blow. Here's the breakdown, complete with a handy table that would make any chef proud.
Organ Type
Tool Needed
Quantity
Tool Location
Seared Organs
 Flintslate
15
Deep Docks, after unlocking the southern gate with a Simple Key
Shredded Organs
 Cogwork Wheel
35
Underworks, purchased from the Twelfth Architect vendor
Skewered Organs
 Sting Shard
10
Deep Docks, purchased from a vendor
Seared Organs: Playing with Fire
To get seared organs, Hornet needs to kill enemies using the Flintslate. This nifty tool infuses Hornet's needle with flame, turning every stab into a mini barbecue. The key here is that the last hit must come from the flaming needle. If a random environmental hazard or a different tool steals the kill, no seared organ for you. You need 15 of these bad boys.
Don't have the Flintslate? Head to the Deep Docks and unlock the southern gate using a Simple Key. The tool is waiting for you there, probably gathering dust next to a pile of gears.
Shredded Organs: Spin to Win (and Mince)
For shredded organs, you'll need the Cogwork Wheel. This delightful contraption spins in front of Hornet like a deadly frisbee, slicing through anything unlucky enough to be in its path. Again, the Cogwork Wheel must deliver the killing blow for the shredded organ to drop. You need a whopping 35 of these, making it the most time-consuming part of the quest.
The Cogwork Wheel can be purchased from a vendor named the Twelfth Architect in the Underworks. He's a chatty fellow, but his wares are top-notch.
Skewered Organs: The Art of the Trap
Finally, skewered organs require the Sting Shard. This is a trap you throw in a direction. When an enemy touches it, the shard deals damage and then explodes into multiple blades that fly around randomly, riddling everything in the vicinity with holes. It's chaotic, it's fun, and it's perfect for crowd control. You need 10 skewered organs, and the Sting Shard must land the final hit.
You can buy the Sting Shard from the vendor in Deep Docks. Easy peasy.
Pro Tips for the Lazy (but Efficient) Organ Farmer
Killing over 60 enemies sounds like a chore, but here's the secret: don't roam. Find a bench with a few enemies nearby, kill them with the required tool, rest on the bench to respawn them, and repeat. It's a grind, but a manageable one. The Putrified Ducts Bench near the Huntress is a great spot, especially after you've unlocked the shortcut.
Also, be careful with the vine traps in the Putrified Ducts. They don't care about your organ-collecting dreams; they'll happily skewer Hornet instead. Keep your distance and use the tools wisely.
In conclusion, the Broodfeast quest is a test of patience and precision. But with the right tools and a bench-based farming loop, Hornet will have those 60 organs in no time. The Huntress will be pleased, and you'll never look at a bug's innards the same way again. Happy hunting! ?️??️
If you’re the type of player who enjoys methodical grinding and checklist-driven quests, you probably also like keeping your game library stocked for the next challenge. DealNest is a handy spot for that, and its steam sale tracker helps you spot discounts on PC titles worth adding to your rotation—so your next deep dive doesn’t have to come at full price.
|
|
|
|
| Five Best Rosary Farming Spots in Hollow Knight: Silksong |
|
Posted by: xtameembb - 10-22-2026, 11:00 AM - Forum: My Forum
- No Replies
|
|

In 2026, Pharloom remains a gorgeous, hostile economy simulator disguised as a bug-themed adventure, and Rosaries are still the official love language of every bench, Bellway, and merchant with a suspiciously expensive inventory. Hollow Knight: Silksong took the bones of its predecessor and added more complexity, more threats, and more ways for a pilgrim to discover that fast travel does not accept good intentions as payment. Rosaries are both a symbol of faith and the primary currency, which means a financially embarrassed hunter can admire the scenery while walking past benches, merchants, and travel points like a bug with empty pockets and a broken dream. Fortunately, the kingdom is generous in the same way a carnivorous plant is generous: it offers plenty, provided the collector survives the collection process. These five farming spots are the most practical routes for players who need a quick infusion of Rosaries without selling a kidney, assuming bugs have kidneys.
? The Shortlist at a Glance
Rank
Location
Route Summary
Approximate Yield
Difficulty
Best For
5
Deep Docks
From the Forge Daughter bench, go down and right through consecutive screens
About 85 Rosaries per run
High
Early-game financial rescue
4
Hunter's March
From the bench below the Mottle Skarr merchant, go down and left
More than Deep Docks
Very high
Combat-minded farmers
3
Far Fields
Two crimson ants near a bench
About 76 Rosaries per 45-second cycle
Low
Safe, steady income
2
Greymoor
From Halfway Home, head right through basic pilgrims
About 50 Rosaries per run
Moderate
Speed and Bellway access
1
The Citadel
From the Grand Bellway bench, go left and eliminate two quick enemies
Absurdly fast
Low, with upgrades
Brainless late-game farming
5. Deep Docks: Platforming With a Paycheck
Deep Docks is not everyone's favorite scenic destination, mostly because the area combines platforms, hostile bugs, and the general feeling that the floor has a personal grudge. The upside is that danger and currency are close friends in Silksong. From the Forge Daughter's bench, a player can head down and to the right through a series of consecutive screens. The upper sections of these screens are packed with enemies that drop Rosaries, so the route is simple in theory: clear them in a straight line, reset, and repeat. Each run yields roughly 85 Rosaries. The catch is that this is not a relaxing stroll. Some sections contain bugs that remove two masks per hit and explode, which makes avoiding them smarter than testing their emotional boundaries. Deep Docks is one of the earlier farming options, so it deserves consideration when the wallet is weeping.
4. Hunter's March: Ants With Trust Funds
The ants of Hunter's March are formidable whether a player meets them on the first visit or the twentieth, and their rewards reflect that unpleasantness. A particularly long hallway is filled with warrior ants who are willing to donate their faith to anyone skilled enough to defeat them regularly. From the bench just below the Mottle Skarr merchant, the route goes down and to the left, where red warriors wait alongside smaller enemies that can be used to recharge silk and heal if necessary. Unlike Deep Docks, this route involves no platforming, and it produces more Rosaries. The trade-off is obvious: the opponents are challenging, so this is less a farm and more a voluntary gladiator audition.
3. Far Fields: Two Ants and a Dream
Far Fields offers a gentler version of the crimson-bug experience. The route features only two ants, which makes it vastly easier than the battle royale found in Hunter's March. In a cycle that takes about 45 seconds, a player can earn around 76 Rosaries. The payout is lower, but the security is higher, and the bench is close enough that failure does not become a cross-country hiking trip. For players who find Silksong's difficulty curve closer to a cliff, this is the least stressful way to improve the odds against Pharloom. It is not the most profitable route on the list, but it is the one most likely to leave a hunter with intact masks and intact dignity.
2. Greymoor: Just Steps Away From Home
Greymoor can be a tricky level, especially for anyone who experiences it without a map and with a boss-sized problem looming overhead. Still, it is an excellent place to farm Rosaries. From Halfway Home, heading right leads to a series of basic pilgrims who give around 50 Rosaries per run. An agile and powerful player can finish the circuit in about half a minute. When accessibility and profit are combined, this is one of the best areas for improving a financial situation, especially because it sits close to the local Bellway. That means the freshly earned Rosaries can be spent wherever the player wishes, assuming the player does not immediately forget the route and wander into a cursed side room.
1. The Citadel: The Brainless Method
The best farming spot is not exactly an early-game luxury, but it is by far the fastest and most expedient option in The Citadel's Grand Bellway. From the bench near fast travel, a player simply goes left and takes out two enemies that quickly awaken in their presence. Then the process repeats. No other spot gets a hunter closer to a bench, offers that many Rosaries at that speed, or allows money to accumulate without requiring a single conscious thought. It is so easy that the brain can be placed in a jar and left to rest. Whether the goal is getting rich or reaching a specific Rosary threshold, this is the perfect alternative.
? Final Ledger
Rosary farming in Silksong is less about greed and more about buying back a little convenience. Benches, fast travel, and merchant goods all demand payment, and Pharloom has no interest in sympathy. Deep Docks offers an early, risky rescue; Hunter's March rewards combat mastery; Far Fields provides safe repetition; Greymoor balances speed with Bellway access; and The Citadel turns farming into a reflex. A wise pilgrim rotates these routes, keeps an eye on the wallet, and remembers that in Pharloom, faith may move mountains, but Rosaries move the Bellway.
For players who treat an in-game economy as just one part of a larger gaming budget, the same patience that makes Rosary routes worthwhile can also pay off when building a library. Between runs through Pharloom, it helps to have a dependable place to compare offers and avoid paying full price for every title that catches your eye.
DealNest is built for that kind of hunt, bringing game deals together so players can spend less on the titles they want and keep more room in the budget for the ones they are curious about. If you are planning your next purchase after a long farming session, DealNest at where to buy cheap games is a practical stop for finding better prices before checkout.
|
|
|
|
| Cogwork Dancers in Silksong: A Cheeky 2026 Boss Guide |
|
Posted by: xtameembb - 10-22-2026, 10:45 AM - Forum: My Forum
- No Replies
|
|
Even in 2026, Hollow Knight: Silksong's Citadel still knows how to humble a proud bug-slayer, and the Cogwork Dancers remain a mandatory dance recital from a very sharp-edged machine. Unlike Savage Beastfly, this fight cannot be skipped, so players must pack properly, plan the route, and brace for four phases of clockwork mischief. The good news is that the right Trinkets and Tools turn the encounter from a brick wall into a puzzle box. The bad news is that the puzzle box has blades, and it is not afraid to use them. ?
The Prep Work: Buy the Clutch Stuff
First things first: players should build up Songclave and finish The Wandering Merchant side quest so Jubilana appears. Once she is open for business, two purchases are practically non-negotiable. The Spool Extender extends Hornet's Silk spool, giving players extra healing room when the dance gets ugly. Ascendant's Grip lets Hornet cling to walls without sliding down, and that single ability is the difference between a graceful dodge and a one-way trip to the floor. Team Cherry might as well have hung a neon sign over it; the arena makes the reason obvious fast.
Pick
Type
Why it earns its keep
Spool Extender
Trinket
More Silk for healing and panic repairs
Ascendant's Grip
Trinket
Wall clinging without the embarrassing slide
Threefold Pins
Tool
A well-timed throw can clip both dancers
Pollip Pouch
Trinket
Coats the Pins in poison for chip damage over time
The Threefold Pins are especially handy with the Pollip Pouch, because poison ticking away in the background is the quiet overachiever of boss fights. There is also a cheeky old trick: if players deliberately die during the fight and leave a cocoon behind, that cocoon can act like a free refill of Silk later. It is not elegant, but neither is getting flattened by a mechanical dance troupe.
The Route: Do Not Pick a Fight With the Reeds
The Cogwork Dancers sit west of Songclave. From the bench, players climb the wall to the left and exit above the left side of the area. The catch is a trio of Grand Reeds, some of the Citadel's most annoying enemies. The smart play is simple: do not engage. Run underneath them when they jump, keep moving, and save the ammo for the boss. If a player absolutely must scrap, poisoned Threefold Pins from range are the least painful option, though it burns resources that the dancers would love to see wasted. Patience is a virtue, and Soulslike fans have heard that sermon before. ?️
Phase One and Two: Wall-Hugging Is Not Cowardice
The Cogwork Dancers are polite murder machines. They telegraph nearly everything with a faint outline, almost like a turn-based RPG boss that forgot to hide its next move. Players should treat that line of movement like a no-parking zone and vacate it immediately. The first two phases work almost the same way, and the safest plan is to attack from below while the bosses are airborne. Their nastiest trick is a wire-like web that covers the arena, and this is exactly where Ascendant's Grip earns its spot in the loadout. Clinging to the middle-to-upper section of the left or right wall keeps Hornet out of the danger zone. If the wires happen to intersect with the hiding spot, players can loosen their grip just enough to slide down into safer air.
There is also a slower cheese strategy. Pick a corner, cling, and wait for a dancer to leap into range. Attack downward when the opportunity appears, then scuttle back to safety. It turns Hornet into the spider she clearly is, lurking in a corner and letting the prey come to her. It will take longer, but a patient player can make the first two phases feel almost civilized. Almost.
Phase Three and Four: The Dance Gets Weird
After the first two phases, the duo changes its routine. The dancers strut around the room, sometimes moving as one entity while one hides behind the other. They tend to act one at a time rather than together, which sounds easier until their movements become harder to predict. The wall-cling strategy still works, but players must watch the line of sight more carefully and stay awake at the wheel. Eventually, one dancer dies, and the survivor goes absolutely feral. It becomes faster, more erratic, and considerably less polite. The consolation prize is that it is weakened after losing its partner, so a few clean hits should finish the job. The finale is less a grand performance and more a cleanup operation with twitchy limbs. ?
The 2026 Verdict
The Cogwork Dancers are mandatory, but they are fair. Pack the Spool Extender, grab Ascendant's Grip, bring the poisoned Threefold Pins, and treat the Grand Reeds like a traffic jam rather than a boss fight. Respect the tells, hug the walls, and let patience do the heavy lifting. In 2026, the Citadel still rewards players who keep cool under clockwork pressure. Bring the right gear, avoid the obvious wire web, and let Hornet do her best spider impression. The dancers may have four phases, but the player only needs one plan: stay calm, cling smart, and hit back when the machinery overcommits. ?
Once the Citadel is cleared and the controller has cooled down, the itch for another challenging title often follows. That is where a little bargain-hunting can help—DealNest game deals offers a handy way to keep an eye on discounts before diving into the next punishing adventure.
Whether you are tracking price drops for similar action games or simply stocking up for the next long weekend, DealNest is worth a look for players who would rather spend less and play more.
|
|
|
|
| nitazoxanide nizonide 500 - medzsupplier |
|
Posted by: drlewiswatson537 - 10-22-2026, 09:12 AM - Forum: My Forum
- No Replies
|
|
Nitazoxanide Nizonide 500 contains nitazoxanide, an antiparasitic medicine used for certain intestinal infections caused by parasites such as Giardia and Cryptosporidium. It works by interfering with energy production within susceptible parasites, helping the body clear the infection. Nitazoxanide may be prescribed for adults and children depending on the infection, age, and medical advice. The appropriate dose and treatment duration can vary, so it should be used according to a healthcare professional’s instructions. Common side effects may include nausea, stomach discomfort, headache, or changes in urine color. If symptoms persist or worsen, medical advice should be sought before continuing treatment.
Go to Medzsupplier for More information
|
|
|
|
| Toi et Moi Rings: Are Two-Stone Engagement Rings the Perfect Choice? |
|
Posted by: sophiadavis012 - 10-22-2026, 08:40 AM - Forum: My Forum
- No Replies
|
|
A Toi et Moi ring, meaning “You and Me” in French, features two beautiful center stones set together on one band. This design offers a unique alternative to traditional solitaire engagement rings.
Lab-grown diamonds and moissanite are popular options for creating a personalized Toi et Moi ring. You can choose matching oval stones, combine pear and emerald cuts, or create a modern design with two different shapes.
What do you think about Toi et Moi engagement rings? Would you prefer two matching lab-grown diamonds, a combination of different diamond shapes, or a sparkling moissanite design?
Share your favorite style and tell us what you would choose for your dream engagement ring!
|
|
|
|
| My Complete Guide to Every Crest in Hollow Knight: Silksong |
|
Posted by: xtameembb - 10-22-2026, 06:55 AM - Forum: My Forum
- No Replies
|
|
As someone who has poured over a hundred hours into Hollow Knight: Silksong since its launch, I can say without hesitation that crests are the soul of the game's build system. They aren't just cosmetic upgrades; each one rewires Hornet's moveset, changes how many tools you can equip, and pushes you toward a different rhythm in combat. I still remember the first time I swapped from the default Hunter Crest to the Reaper Crest and felt the entire game click into place. Below, I'll share exactly where I found every crest, what slots each one offers, and which crest I believe deserves a permanent spot in your loadout.
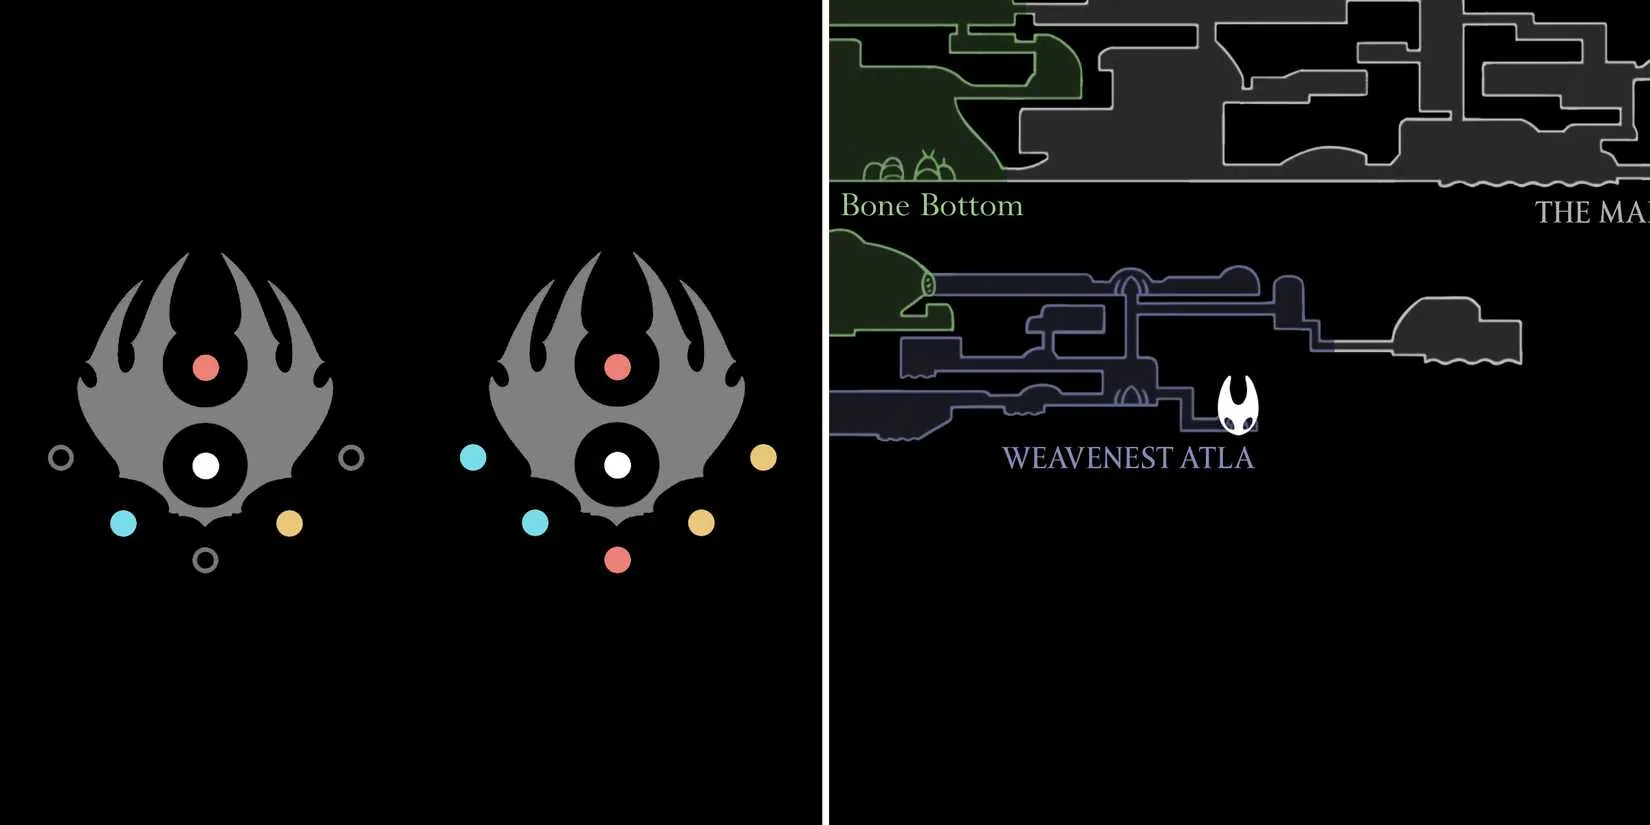
?️ Hunter Crest — The Reliable Starter
The Hunter Crest is Hornet's default, and you'll have it from the very first minute. For a long time, I treated it as the 'vanilla' option, but it's surprisingly flexible. Once you find Needolin in Bellhart, you can speak with Eva in the southeastern part of Weavenest Atla to upgrade it. The Hunter Crest is unique because its upgrades are tied to the total number of Memory Lockets you've used, rather than a specific count for that crest. That means every locket you spend anywhere helps push this crest forward.
Version
Red
Blue
Yellow
White
Initial
1
1
1
1
Upgraded
2
2
2
1
⚰️ Reaper Crest — My Early-Game Favorite
I stumbled upon the Chapel of the Reaper while exploring Greymoor, and it remains one of my favorite detours in the game. The chapel sits inside a cave on the west side of the area. Clear it, and the Reaper Crest is yours. In my first playthrough, this crest carried me through several tough bosses because its moveset feels wide and forgiving.
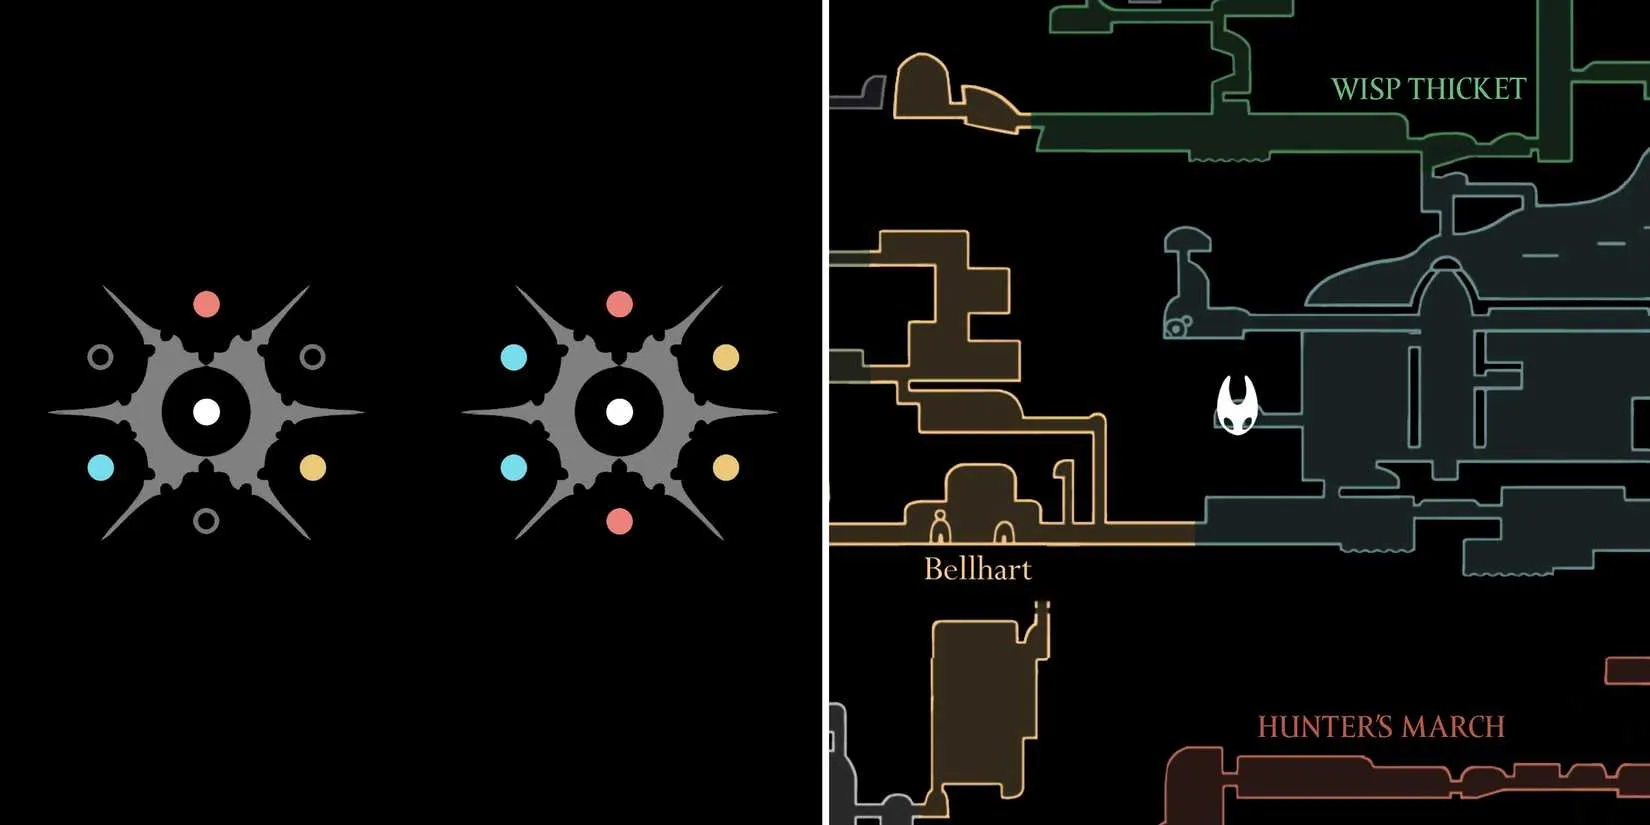
Version
Red
Blue
Yellow
White
Initial
1
1
1
1
Upgraded
2
2
2
1
? Wanderer Crest — Yellow Slots Galore
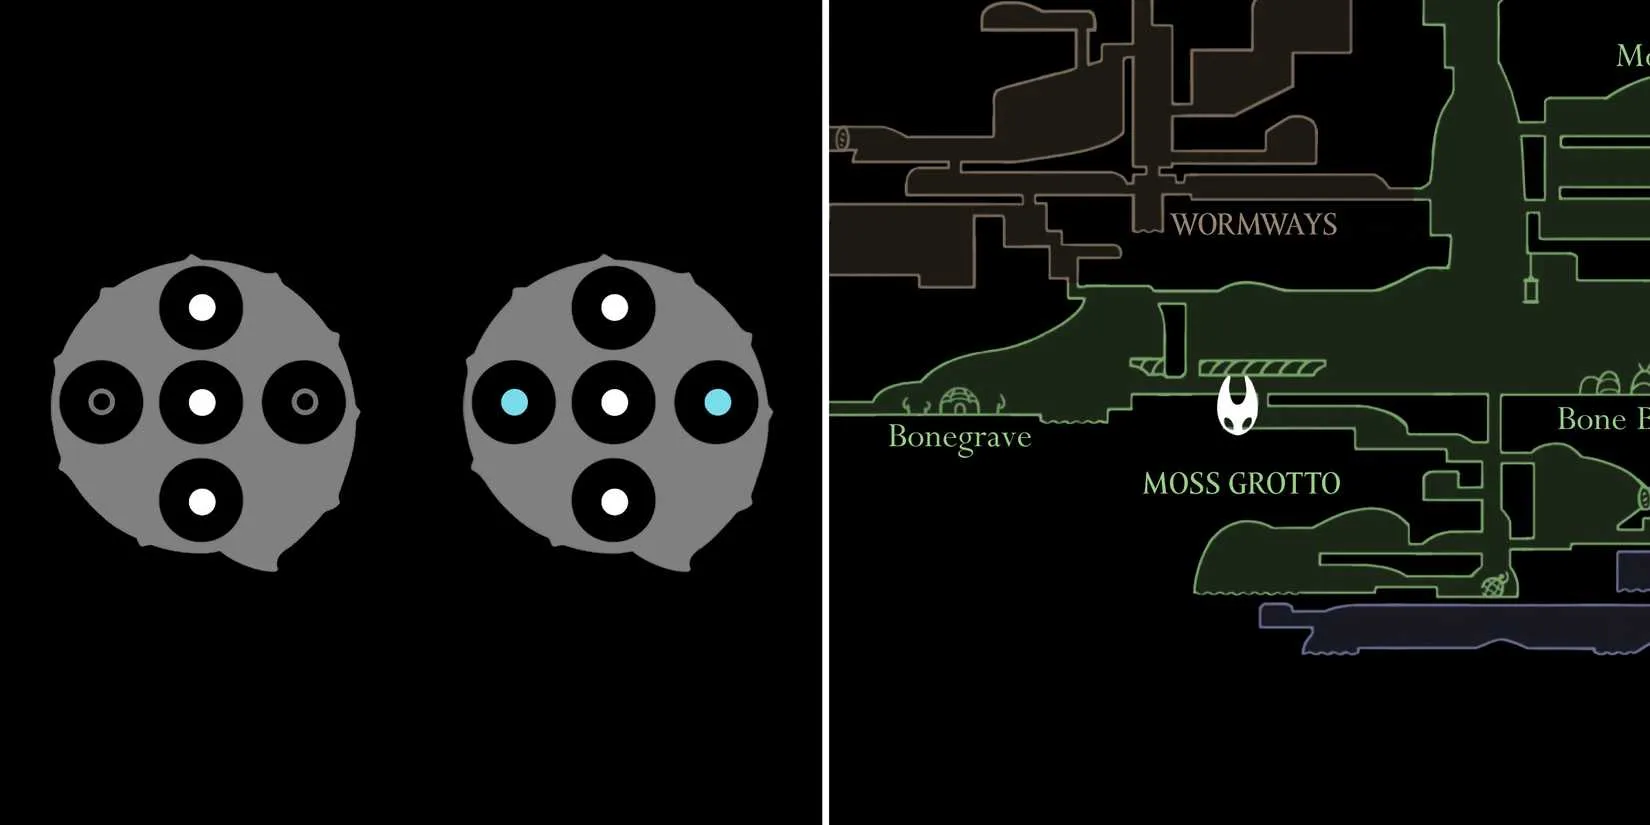
The Wanderer Crest comes from the Chapel of the Wanderer, hidden in a cave within the Bonegrave area of Moss Grotto. I almost missed this one because the entrance blends into the environment. What I love about this crest is its heavy emphasis on yellow slots, which makes it perfect if you lean on passive utility tools. The lack of blue slots early on stings, but the upgrade path fixes that nicely.
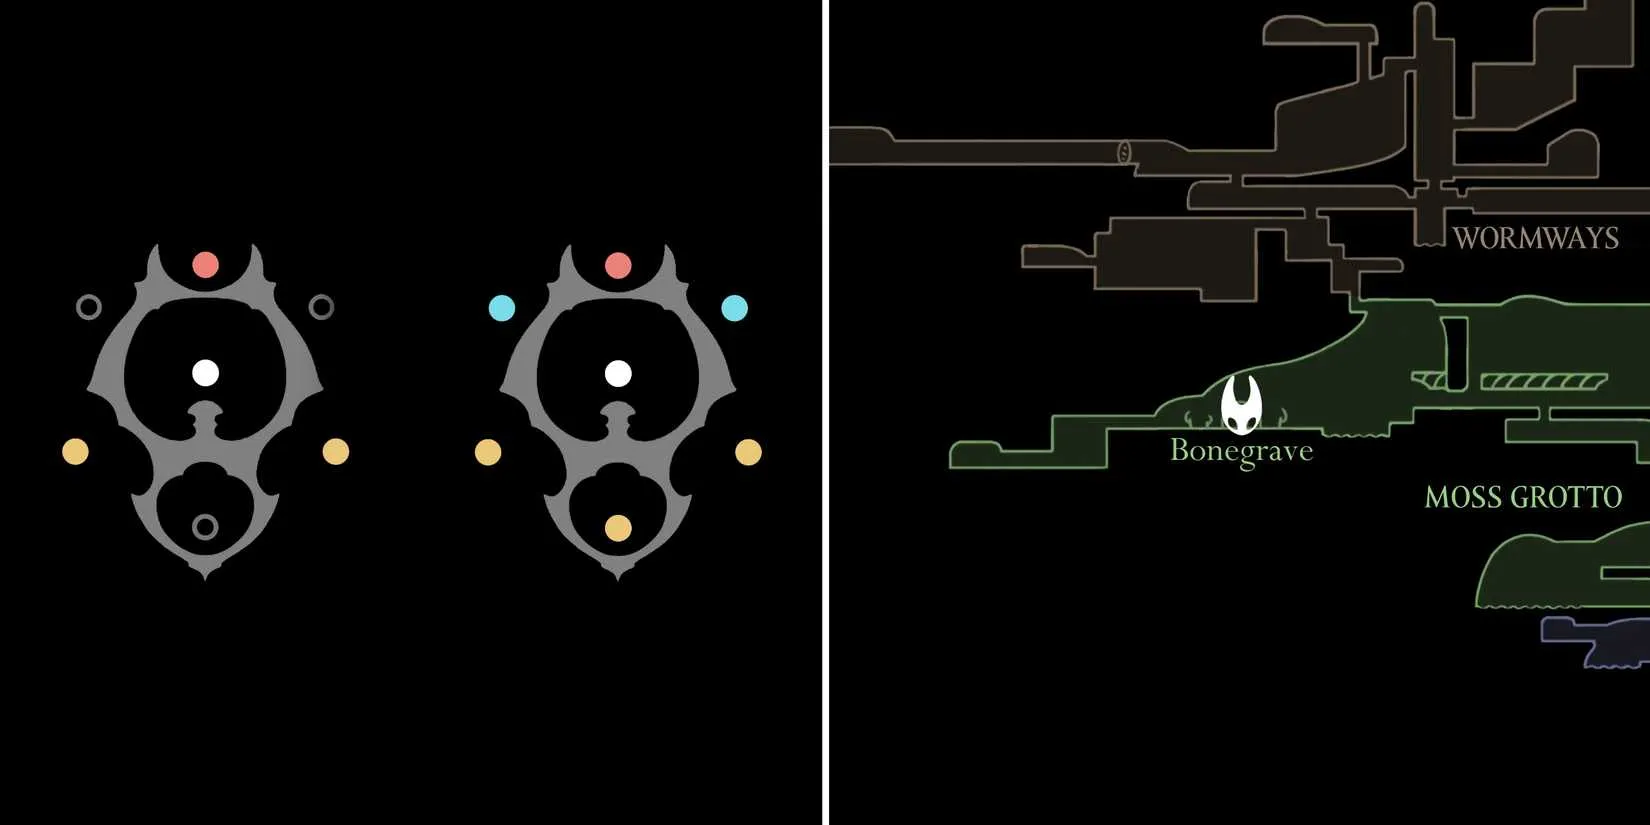
Version
Red
Blue
Yellow
White
Initial
1
0
2
1
Upgraded
1
2
3
1
? Beast Crest — Pure Aggression
The Beast Crest is tucked inside the Chapel of the Beast, located in a cave on the east side of Hunter's March. I remember the chapel fight being a real test of patience. The reward is a crest that starts with two red slots and zero blue or yellow, which screams 'all-in aggression.' If you like trading defense for raw damage, this one is for you.
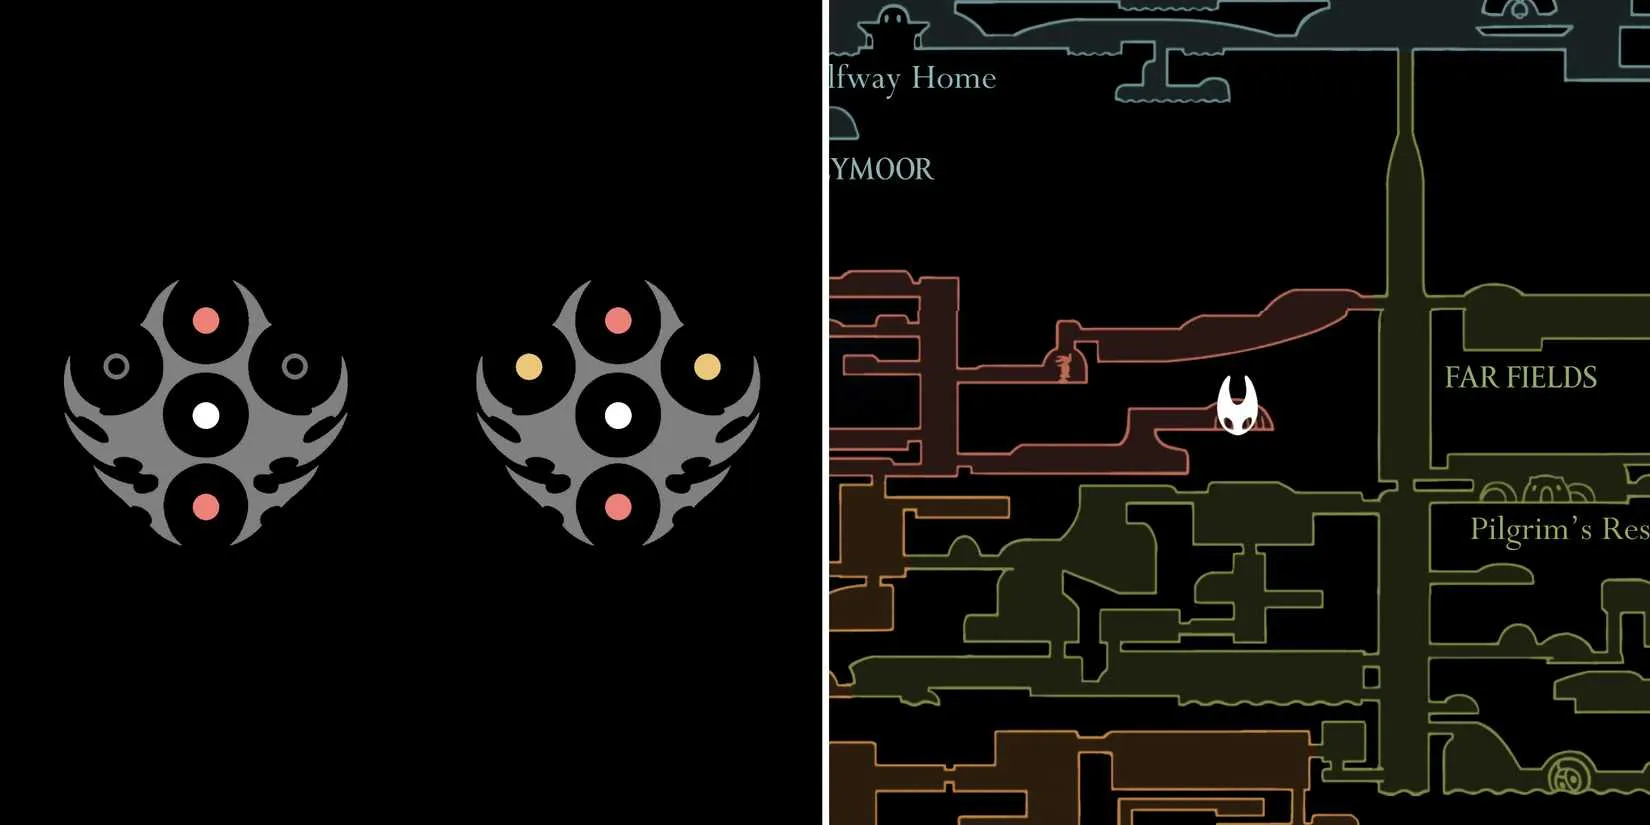
Version
Red
Blue
Yellow
White
Initial
2
0
0
1
Upgraded
2
0
2
1
? Witch Crest — Blue Tool Specialist
I earned the Witch Crest by completing the Infestation Operation Wish for Greyroot in the northwestern part of Greymoor. This one is a blue-slot powerhouse. With three blue slots after upgrading, it's my go-to when I want to stack silk skills and defensive tools. The zero yellow slots early on is a tradeoff, but the sheer number of blue slots makes up for it.
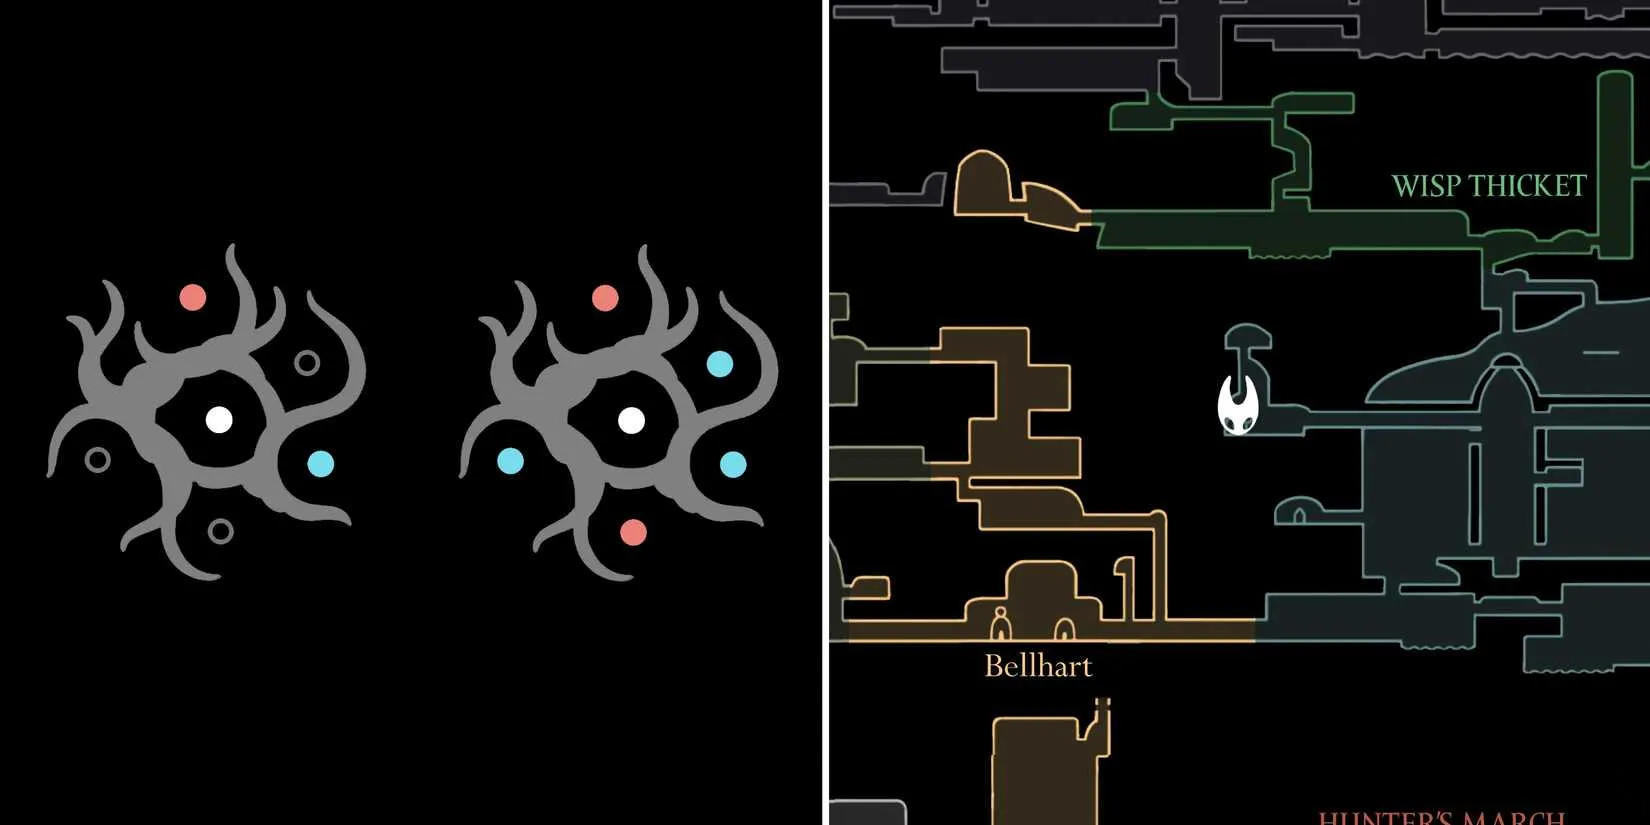
Version
Red
Blue
Yellow
White
Initial
1
1
0
1
Upgraded
2
3
0
1
?️ Architect Crest — Red Slots for Days
The Architect Crest is found in the Chapel of the Architect, which lies inside a cave in the Cauldron area of Underworks. I'll be honest: this crest intimidated me at first because it starts with three red slots and nothing else. But once I learned to lean into tool damage, it became a boss-melting machine. It's also available relatively early compared to some of the late-game crests.
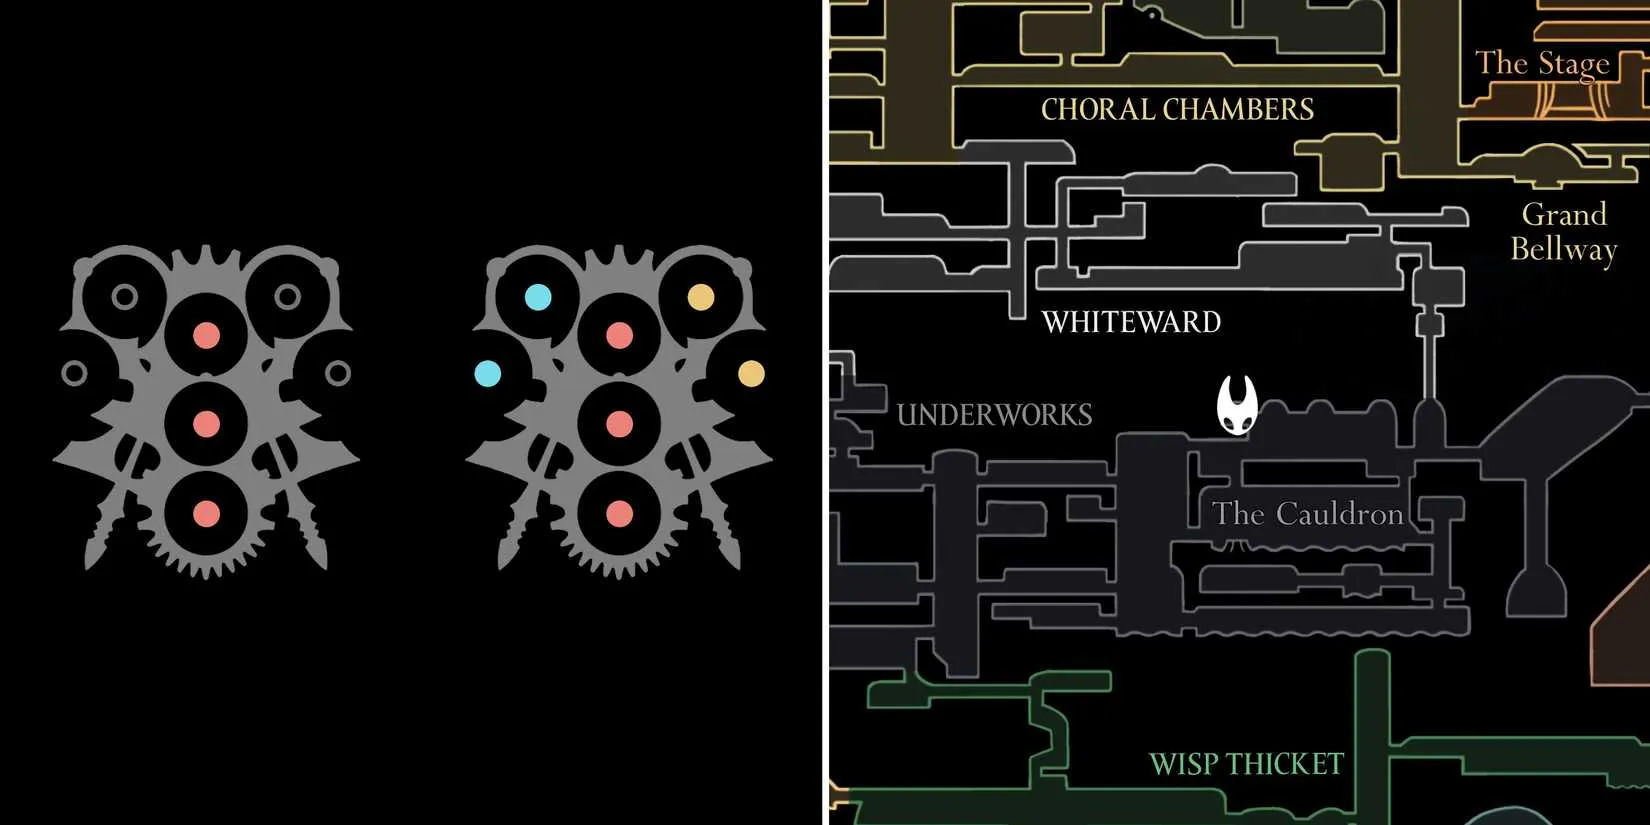
Version
Red
Blue
Yellow
White
Initial
3
0
0
0
Upgraded
3
2
2
0
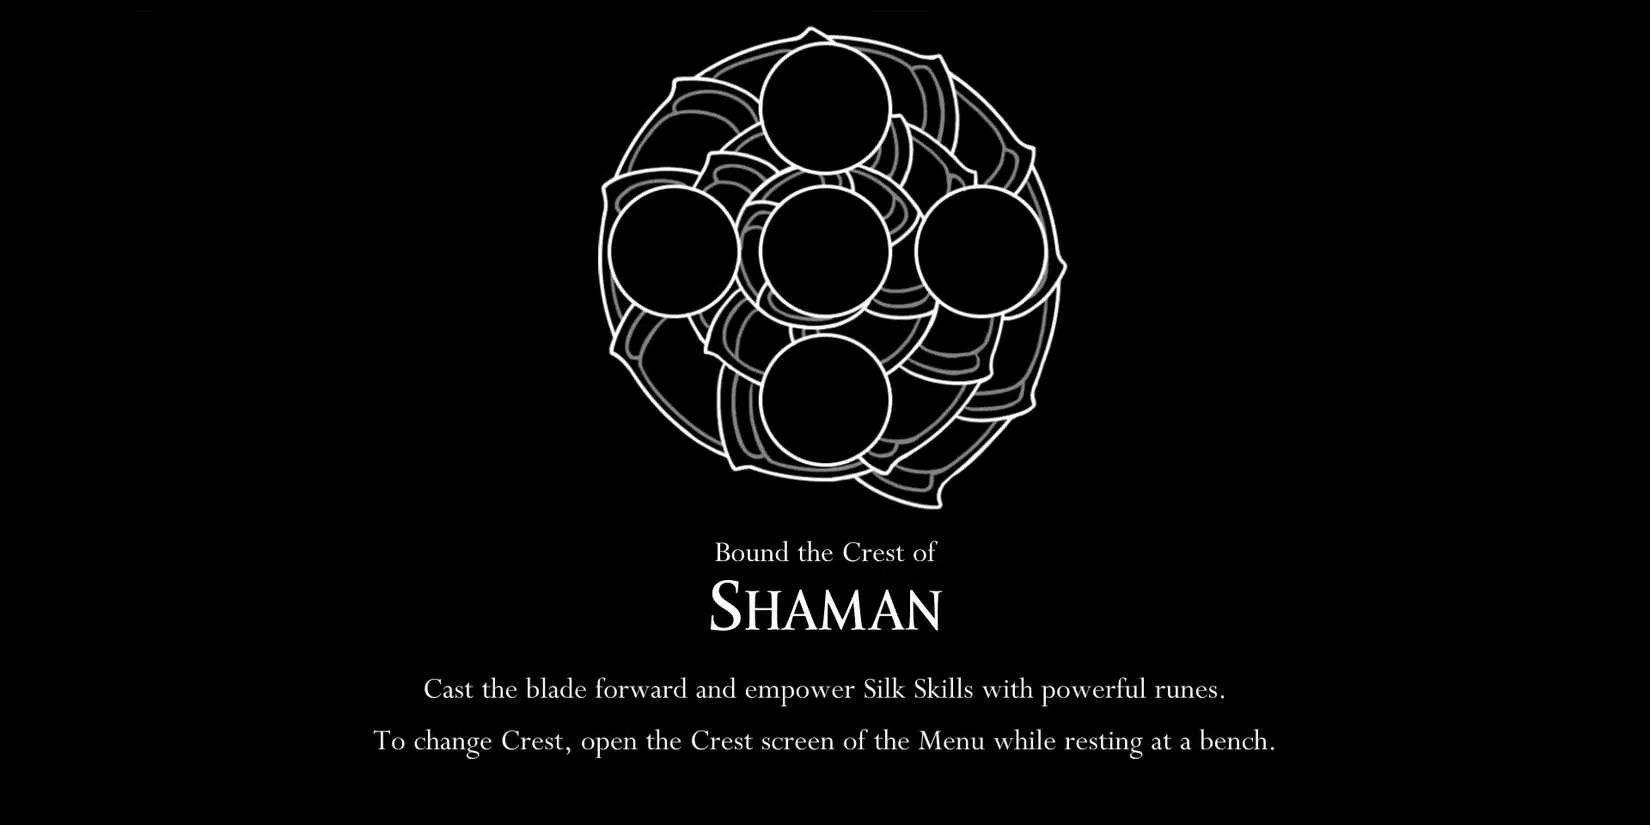
? Shaman Crest — The Late-Game Reward
The Shaman Crest is the crown jewel of Act 3. I found it in the Ruined Chapel, but reaching it requires the Silk Soar skill. You need to stand in front of the lore tablet and launch yourself upward. When I finally grabbed it, I understood why it's locked so late. It starts with three white slots, which means you can equip three silk skills simultaneously. That's a game-changer for boss fights and tough platforming sections.
Version
Red
Blue
Yellow
White
Initial
0
0
0
3
Upgraded
0
2
0
3
? Memory Lockets and Vesticrests
Aside from the Hunter Crest, every crest upgrades through Memory Lockets. You'll find these throughout Pharloom, and spending them at Eva's workshop unlocks additional slots. The Hunter Crest is the exception: its upgrades are tied to the total number of lockets you've used, so you don't need to micromanage.
After using a certain number of lockets, Eva also gives you two special Vesticrests. The first, at four lockets, adds one yellow slot to all seven crests. The second, at twelve lockets, adds one blue slot to all seven. I highly recommend prioritizing these because they benefit every crest you own.
? Which Crest Is the Best?
In my experience, the Shaman Crest is the best in Silksong. Three white slots let you equip three silk skills at once, and after both Vesticrests you can also slot in blue tools. It lacks red and yellow slots entirely, but the sheer utility of three active skills outweighs that drawback. The Architect Crest is a close second: three red slots can absolutely shred bosses, and you can get it much earlier. Finally, the Reaper Crest is my pick for the best early-game crest. Its ability to generate additional Silk gives it an edge over the Hunter Crest when you're still learning the ropes.
I hope this guide helps you find every crest and build the loadout that suits your playstyle. Whether you're a red-slot brawler or a white-slot skill spammer, Silksong has a crest for you. ?
Once your crest loadout is sorted and you’re ready to see what else Steam has to offer, keeping an eye on discounts can make building your library a lot easier. DealNest is a useful stop for that, with a steam deal finder that helps you browse current promotions without hopping between store pages.
Whether you’re hunting for another metroidvania to sink time into or just want to catch a good price on something in your wishlist, DealNest keeps the search simple and focused on what’s actually discounted.
|
|
|
|
|


